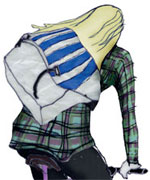
 With Spring returning, it’s time to get back on your bikes and if your favourite carrier from last year has joined previous ones in bag-heaven over the winter, here’s how to make a new one! Stylish, practical and absolutely unique – Messenger Bag DIY!
Illustration by Evelyn Bracewell
You will need:
*Plastic bags (thin, flimsy ones work best)
*Parchment paper, freezer paper or plain old copier paper
*Iron and ironing board
*Straps
*Buckles
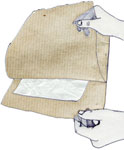
 1. First melt a load of plastic bags together to make a fake Tyvek-type material. To do this, flatten out a plastic bag and trim the bottom seam and handles off, this allows the bag to be opened up into a larger rectangle of plastic. If it has printing on it, turn it inside out because once the ink heats up it comes off the bag and makes a huge mess. If the bag has an interesting design that you’d like to preserve, try using a clear plastic bag layered on top of the printed one.
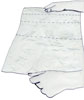 2. Between six-eight layers of plastic gives the best results, so you can either fold your bag twice until it is eight-ply thick, or use three or more bags layered on top of one another. Trying to fuse less than six layers often results in little holes forming in the finished piece and a generally weaker material.
 3. Sandwich your plastic bags between two layers of parchment (greaseproof paper) to protect your iron.
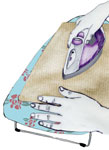 4. Run a hot iron (we set ours to “Rayon”, but you’ll need to experiment a little to see what works for you) and keep the iron moving constantly. Make sure to get the edges, and after about 15 seconds, flip it over and iron the opposite side for a few seconds. Peel a corner of the paper back to see if the plastic is fused together. It should be fairly smooth and “one sheet” to the touch (watch out, it’s a little hot). If the layers are not all melted together, iron it some more. Peel the parchment paper away from the finished plastic sheet.
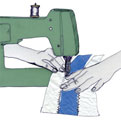 5. Using a sewing machine sew together several pieces of fused plastic (we find zig zag stitch works best) to create one large sheet.
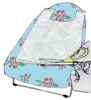
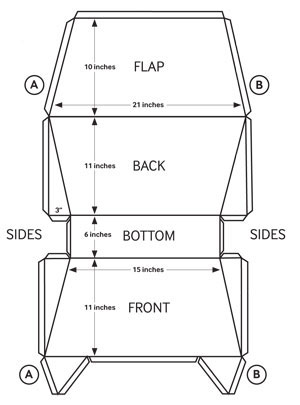 6. On your large sheet of plastic, use a crayon/chalk to mark out the dimensions of the plan featured here. You can now construct your bag as follows:
– Sew the sides together
– Sew the bottom to the bottom of the sides
– Sew A to A and B to B
– Sew the edges over on the flap and the front
– Sew on the straps
– Attach velcro/buckles to the flap at the front
– Put stuff in and go!
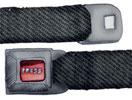 7. To create the straps for your bag, it is much cheaper and easier to use second hand bag straps or even an old car seat buckle.